Automating time-consuming tasks to fast-track materials research
A new open-source software package developed by Monash University researcher Julian Ceddia aims to significantly streamline the study of materials using Scanning Tunnelling Microscopes (STMs). The software, named Scanbot, automates the time-consuming probe optimisation and data acquisition processes essential for STM experiments, helping to accelerate 2D materials research by enabling detailed investigation after the STM tip has been automatically optimised and sharpened.
“We hope that Scanbot will benefit STM labs around the world and represent a meaningful step towards full automation of STM experiments,” says A/Prof Agustin Schiffrin, also at Monash.

STMs are powerful tools that allow atomic-scale exploration and characterisation of material surfaces, but considerable time must be spent optimising the instrument.
Transforming materials research with STM automation
Exploring and characterising the atomic landscape of surfaces has become a fundamental pursuit in modern science. STMs are among the most powerful tools that let scientists probe and interact with the world at this unimaginable scale, providing images and spectroscopic data that enable us to peer into the quantum realm and see how materials behave at the atomic level.
STMs work by scanning a probe, sharpened down to a single atom, across the surface of a material while monitoring an electric current. This current carries all the information necessary to build up atomic-scale images of the surface.
However, achieving these breath-taking images is no easy feat. A probe sharpened to the size of a single atom is extremely fragile, and even the slightest contact with another atom, molecule, or debris can drastically alter the probe’s effectiveness, requiring researchers to spend considerable time optimising the instrument to ensure it captures high-quality, reliable data.
Introducing Scanbot

“We hope that Scanbot will benefit STM labs around the world and represent a meaningful step towards full automation of STM experiments”– corresponding author and team leader A/Prof Agustin Schiffrin (Monash)
Researchers at Monash University, led by Julian Ceddia, have developed a reliable way to automate this STM optimisation process, resulting in the creation of Scanbot—a freely available open-source software package.
Julian explains that a revelation came to him after getting tired of the hours he routinely wasted optimising and sharpening the STM tip just to get meaningful data:
Julian reflects on the inspiration behind Scanbot: “After countless hours spent fine-tuning the STM during my PhD, I discovered that the quality of the probe could be easily quantified by imaging imprints that the it leaves behind after being poked just a few angstroms into the surface.”
These imprints carry information about the arrangement of atoms at the tip of the scanning probe and are key to predicting how good the data will be before acquiring it. “Basically, sharper tips leave behind smaller imprints. So, Scanbot automates the process by repeatedly pressing the tip into the surface until the imprint shows that the tip is sharp enough for high-quality imaging,” Julian explains.

“Scanbot uses simple algorithms to measure the size and symmetry of the probe apex” – Scanbot collaborator Dr Benjamin Lowe
This straightforward approach to ‘tip shaping’ avoids many of the challenges associated with using machine learning for similar tasks. “Instead of training an AI on vast amounts of labelled data to recognise high-quality images, Scanbot uses simple algorithms to measure the size and symmetry of the probe apex based on the imprints it leaves,” adds Dr. Benjamin Lowe, a key collaborator on the project.
But Scanbot’s capabilities extend beyond just tip shaping. It also automates common data acquisition techniques, such as sample surveying, making STMs easier to operate overall. “My goal with Scanbot was to make STM more accessible and user-friendly,” says Julian. “That’s why I invested a lot of time into designing an intuitive user interface and writing comprehensive documentation.”
Industry Recognition and Impact

“Scanbot has the heretical potential to get up-and-coming surface scientists thinking about the data instead of clicking the button” – Scanbot contributor Jack Hellerstedt
Scanbot’s potential was aptly captured by former Monash University researcher Jack Hellerstedt, who also made significant contributions to the project, “Scanbot has the heretical potential to get-up-and coming surface scientists thinking about the data instead of clicking the button.”
The industry is already taking notice of Scanbot’s capabilities. SPECS, a leading company in STM system control, recently contacted Julian after discovering Scanbot. “Receiving an email from SPECS asking to include links to Scanbot in their documentation was incredibly encouraging,” Julian reflects. “It’s a strong validation that our work could genuinely make a difference in the way STMs are operated.”
Acknowledgements
The researchers wish to express their gratitude and thank FLEET who made this project possible via funding through the FLEET Translation Program.
More information
- The paper detailing Scanbot’s development and applications Scanbot: An STM Automation Bot was published in The Journal of Open-Source Software on 15 July, 2024. DOI: 10.21105/joss.06028
- For more details about Scanbot, you can access the full documentation at https://new-horizons-spm.github.io/scanbot/
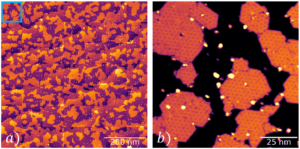
Scanbot autonomous survey: a) An autonomous survey of a 2D metal-organic framework comprised of 49 STM images in a 7×7 grid stitched together, acquired by Scanbot after it prepared a ‘good STM tip’ automatically. b) A single STM image extracted from the automated survey (blue box in a)).
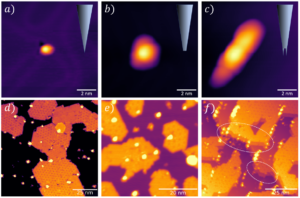
Scanbot uses tip imprints to predict image quality. a-c) Tip imprints created by sharp, blunt, and doubled tips, respectively, on a clean metal surface. The insets in the top right show what the tip might look like at the atomic scale, based on the imprints, which were created with a gentle crash depth of just 0.9 nm. d-f) STM images of a 2D metal-organic framework acquired by tips with the corresponding imprints in a-c). The quality of the STM images reflects the size and geometry of the imprints created by the scanning probe. The white circles in f) highlight regions where ghosted or doubled features can be seen in the image. These features are present because signal is coming from the multiple apexes of the scanning probe simultaneously.

