A little bit of colourful chemistry, a bit of art and a lesson in density and concentration gradients. Yeh, you will need a lot of skittles, but it is all for science.
Download the full worksheet including worksheet tables and images.
Learning Intentions
Students will examine and be able to describe/understand the following:
- What happens when materials are mixed
- The solubility of common materials in water
- How density affects liquids
The difference between solutes and solvents.
Overview
You will make a hypothesis (a prediction) about what you think will happen. Try to give reasons for your hypothesis.
Write down everything you observe while doing each experiment. You might like to draw a picture.
Discuss your findings with your class. Was your hypothesis supported? Did anything happen that you didn’t expect? Can you explain what you have observed? What difficulties did you run into?
The tables for each experiment can be found in the downloadable worksheet.
Hypothesis
Skittles have a coating of sugar mixed with food dye to give them their different colours. In experiment 1 you are going to see what food dye alone does in water. Use what you observe here to infer what you think will happen in the following experiments where you use skittles. Refine your hypothesis as you work through each experiment. There is a place in each experiment’s table to write your hypothesis.
Materials
- White bowl or plate, slightly slanted towards the centre (paper plates should work well)
- Skittles
- Water (warm water will work best, but cold water is fine)
- Food dye (any colour)
- Eye dropper or pipette. A straw works OK also – just insert into liquid and hold the top.
Method
If you are doing this as part of a class activity, work in groups of 2-3 students.
Notes: In each experiment, it works best if your plate is on a level surface.
Experiment 1. Dye only
Method: In your bowl/plate place enough water to almost fill the plate or about 0.5 cm in your bowl. Make sure the water is still. Use the pipette/eye dropper/straw to place one drop of food colouring in the middle of the water. What happens to the food dye? Complete Table 1.
Experiment 2: One colour at a time
Method: Place a skittle in a bowl or plate, and add water until the skittle is submerged. Observe what happens over the next 2-3 minutes. What happens if you add multiple skittles of the same colour into the middle of a bowl of water? What will happen if you then add more water? Compare this to the food dye in experiment 1. Complete Table 2.
Experiment 3: Mixing colours
Part A:
Method: Carefully place a yellow and a red skittle on opposite sides of the bowl, or at least 4cm apart. Add a layer of water to submerge the skittles. Observe what happens over the next 2-3 minutes. Write your observation in Table 3(a)
Part B:
Method: You should observe that your two colours meet in the middle of your bowl and form a boundary. Why did the boundary form and the colours not mix?
Now place a 1/4 teaspoon of sugar in the middle where the two colours meet. Again, before you do this write what you predict will happen when the sugar is added. Write your observations and what you think is happening in Table 3(b).
Experiment 4: Making a rainbow
Method: In a clean bowl, place skittles around the edge, close to each but not quite touching (though you will get an effect however you do it). You might like to place them in rainbow order (red, orange, yellow, green, purple). Add warm water until the skittles are partially submerged. Watch what happens over the next few minutes. Write your observations and what you think is happening in Table 4.
Get arty: Try arranging the skittles in different patterns and make some cool art. Place them closer together, further apart.
Extension 1: Other colourful foods
What other lollies or foods can you think of that might also work? Have you got anything else in the house you can try? What happens if you use cold water instead of warm/hot water? Write your observations in Table 5.
Extension 2: Rainbow in a glass
This can be tricky to get right and you need to make sure the sugar has nearly all dissolved from the skittle coating. This might take 5 minutes or more. Warm water will work quicker. If you are short on time. You also need a steady hand when adding each layer, which is sometime difficult for the younger kids.
Additional materials:
5 glasses/bowls (any shape)
1 clear glass or cup (close to cylindrical if possible)
A pipette or eye dropper (a straw will work OK also)
Method
In glass 1, place 10 purple skittles
In glass 2, place 8 red skittles
In glass 3, place 6 orange skittles
In glass 4, place 4 yellow skittles
In glass 5, place 2 green skittles
Add two tablespoons of water to each glass, and stir. Wait for the skittles to completely dissolve. Pour the purple water into the cylindrical glass, then use the pipette to very gently transfer the red water into the glass. It works best if you hold the pipette against the side of the glass near the surface of the liquid in the glass and pipette the liquid against the glass. Continue doing this with the orange, then yellow and then green. Make sure that the colours don’t mix together as you add them. If you have time repeat the experiment and add the colours in the reverse order. Do you get the same effect? Write your observations and what you think is happening in Table 6.
Some reflection
Think about or discuss with your group what you observed. Did your hypotheses get more accurate with each experiment? What did you learn? How did your hypotheses and learning compare to other groups?
What is happening
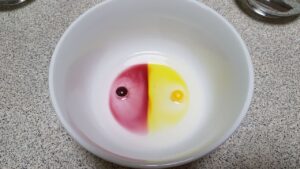
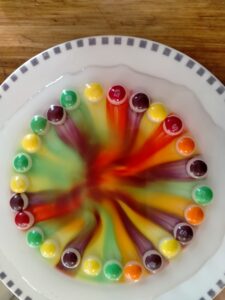
Skittles are coated with sugar and food colouring, which dissolve in the warm water. You should have observed that the colours don’t mix as they run down the plate. See Figure 1 and 2.
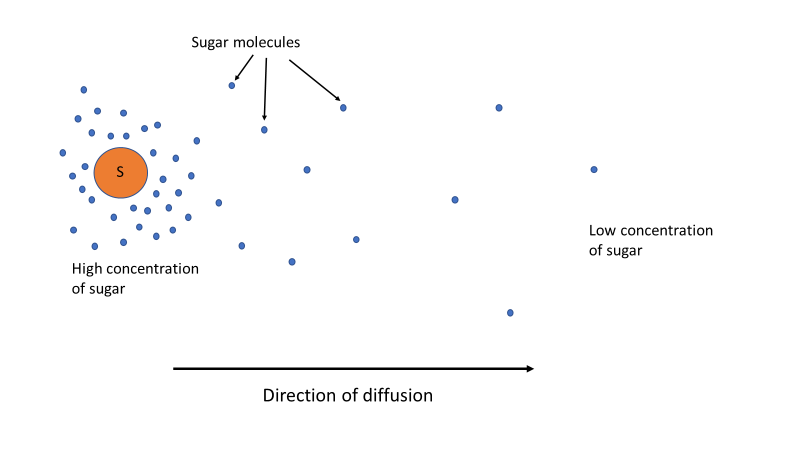
The explanation for this is can be found by understanding concentration gradients. Chemicals or molecules will move (diffuse) from an area where they are in high concentration to an area of lower concentration. This is known as the concentration gradient. In our case, we have the food dye and sugar (the solutes) dissolved in the water (the solution). The sugar/dye dissolve from the Skittle and are in a high concentration immediately around the skittle. The solutes (sugar/dye) will want to move to areas of lower concentration, which will be toward the middle of the plate, or wherever there is lower concentrations of sugar, which will initially be away from the skittle. See Figure 3.
The different colours of each do not mix when they meet because the sugar concentrations are roughly equal for each skittle. This appears as a boundary between each colour because there is no gradient or difference in solute concentration. That is, the sugar (and dye) just stop moving when they reach a sugar concentration that is equal. Instead they continually move (a process called diffusion) to where the sugar concentration is lower. See Figures 1 and 2. If you have the opportunity, leave the plate overnight and check it again the next day. Do the boundaries between the colours still exist?
Figure 1 (left). The sugar/dye will diffuse from areas of high concentration to areas of low concentration. A boundary is formed where the colours meet because the sugar/dye concentrations will be similar and they therefore tend not to mix
Figure 2 (right). Get creative. Because there is no gradient at the boundaries of the colours they tend not to mix and you can arrange the Skittles in creative patterns to create amazing art. See what happens, however, when you leave the plate overnight
Adding sugar: When you add sugar to the middle, you should have observed the different colours moving away from the sugar. What you have done is place a sugar concentration in the middle of your colours that is a lot higher in concentration than the sugar in each of the colours. The sugar you added – being of highest concentration – will want to move to areas of lower concentration, which is away from the middle of the plate where you put your sugar.

Figure 3. Sugar and dye molecules will diffuse (move) from where they are in high concentration around the skittle to areas of lower concentration.
Rainbow in glass: This experiment can be explained by understanding density. What you should have observed is that the different skittle colours form layers in the glass. Remember that when you add water to the skittles that the sugar and dye in the Skittle coating dissolve into the water. This means that the glass with the most skittles (purple) will have a higher amount or concentration of sugar dissolved in the water. The glass with the fewest skittles (green) will have the lowest concentration of sugar in the water. Water with a higher amount of dissolved material will be denser than water with lower amounts of dissolved material. That is, the more solute or dissolved particles in a solution, the higher the density of that solution. In our case, purple with the highest amount of sugar dissolved in the water will be the densest solution. The green solution, with the least dissolved sugar will be the solution with the lowest density. A liquid with a lower density will float on a liquid of higher density. Because you added the liquids in an order of highest density to lowest density, you should have achieved a rainbow with a purple layer at the bottom, then a layer of red, then orange, then yellow and at the top, green. If you had time to add the colours in the reverse order, you should observe that the colours mix together because you keep adding a denser liquid onto a less dense liquid, which means it will want to head for the bottom and in the process mix the two solutions together to become one.
Should the Making a Rainbow experiment prove too tricky for students, a simpler FLEET home science experiment that visualises the concept of liquid densities more explicitly is Layered liquids.
Temperature also affects density. Try FLEET’s home science experiment, Floating water
Other FLEET home science experiments that explore density are the following:
Coke V diet coke https://archive.fleet.org.au/blog/coke-vs-diet-coke/
Dancing sultanas – https://archive.fleet.org.au/blog/dancing-sultanas/
Lava lamp – https://archive.fleet.org.au/blog/lava-lamp/
Acknowledgement: This activity was developed by Andrew Groszek, a FLEET research fellow at the University of Queensland.
Back to FLEET Schools, or all Home Science


